 Probably the smallest USB-DMX Interface in the world
The uDMX is built around an inexpensive Atmel Atmega8 Microprocessor, using only very few external parts, thanks to the excellent firmware-only USB driver from obdev.at.
We managed to cram it all into a Neutrik XLR Connector.
This is the version 1.0 documentation. See the uDMX Homepage for updates
Features
- very small: as small as it can possibly get
- very fast: uDMX transfers only the minimum DXM channels for your application. If you transmit channels 6-12 for example, uDMX will send channels 0-12 only, giving shorter packets = faster transmission.
- very free: built using low cost components, design and software is open source
Done in version 1.0
- There are zener diodes and resistors at the DMX output to provide a minimum short circuit/over voltage protection. It would be nice to have the device completely galvanically isolated. But I can’t see how we could fit this inside.
- The interface goes into sleep with the host computer and wakes up properly
Todos
- We haven’t tested uDMX with low cost fixtures yet. Maybe the transmission speed is too high for fixtures that don’t follow the DMX standard precisely. We might need to add a low-speed mode.
- A status led would be nice (the double sided version, see below, adds a status led in the design, but it is not yet tested nor implemented in firmware)
- Windows driver needs a windows programmer with a windows box
- I might start to sell fully assembled versions to those afraid of building one themselves (see below)
How to build one yourself
Download the sources
You can download the uDMX source files here
Includes the original Eagle-Light files for schematics and board layout, the firmware, and a handy external for MAX/MSP (Mac only, for the moment. We’d love to get some help from someone with a Windows box out there…)

The circuit…
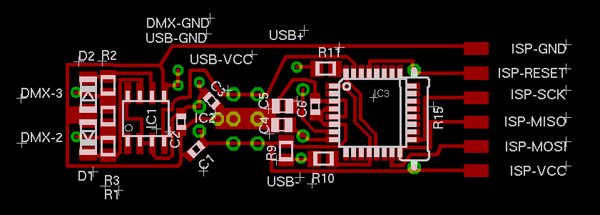
The board layout. We use SMD pads for the serial programming interface as it has to be sawed off anyway after programming the chip in order to save space (see below).
Etch the board.
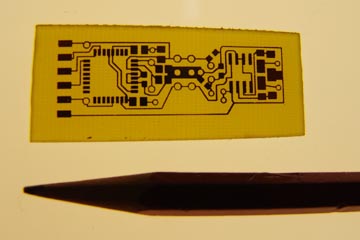
Pretty damn small, already…
If you don’t want to mess with acid and stuff and prefer to have it done by a professional pcb service, you can try this double sided version that is even smaller. I haven’t tested it, though.
Remove unneccessary material.


In order to save space, you’ll have to file away as much as possible from the 12 Mhz crystal, as well as of the XLR Connector. Every thenth of a millimeter counts…
Solder the board and program the chip

We built a custom programming adaptor from an old PCB Card connector. Be sure to program the fuses! It’s a good idea to test the unit before continuing. We soldered the USB cable directly to the pins/resistors for testing, because we needed to desolder them to cut the board in half, and our self-etched board doesn’t like too much soldering/desoldering…
Cut the board in half

We sawed the board in half just between the three jumpers in the middle. The seperate boards will be reconnected with wires.
Sand away as much as possible

The programming pads must go away, and as much of the board as you can handle.

You should even sand away the angles to fit the boards into the connector.

This board still isn’t small enough…

The three finished parts that will go into the XLR connector
Reconnect the boards

The first prototype I did it with hard wire. Not a very good idea. I had a bad solder somewhere and had to bend it open again two times, and finally the copper came off the pcb… Use soft wires instead.

The second version. Put some isolation between the two facing boards.
Assemble


Leave a Reply